Friday, March 21, 2014

Spring nails! (And catch up!)

I feel like I'm always apologizing, but I'M SORRY for slacking with posts. Unfortunately, graduate school trumps nail blogging, but it's always on my mind! Since my last post, I've had a few different styles! First was Valentines day! I had been growing out my nails for a while so I could file them to a dull point to make hearts that I had seen on Pinterest and with other Sensationail users.
Here is this mani,
(The first finger is glitter because my other first finger nail was too short to be a point) for this look, I used Love Struck, Babydoll pink and White Lily. The glitter is a fine, loose glitter that I got from the craft store.

Once these had grown out, I decided to file them flat and do a French mani with my new White Lily


I did the tips freehand with a lot of patience and a steady hand. I do want to purchase and try the Sensationail tips at some point though. I used Baby Doll pink as a base here.

Next, I did a full white mani to get a better idea of what kind of color Whitw Lily was. You can reach opacity with two coats, but I did three for more coverage


I added the silver glitter just for a little fun.

I would call myself a "nervous peeler" and soon after, I had peeled a lot of the polish off. But then it was St. paddys day and I needed a new mani. I don't have any green polish, but I used Little Gold Dress and Mi Amor (which is more orange in my opinion) 
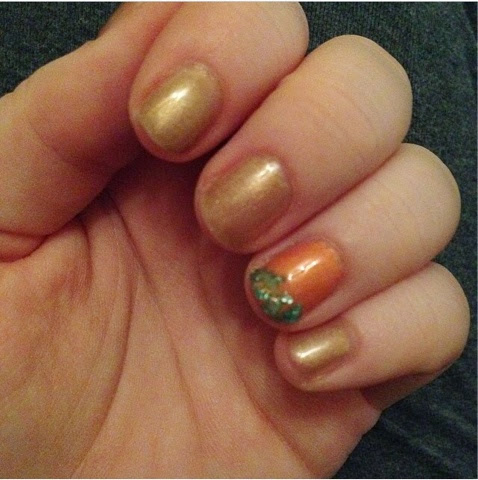
The green are crushed sea-shells that I got in a nail decorating kit from Pound Land. Just the pop of green that I needed for the holiday!

Last night, I changed my nails again and needed a spring mani. I've been wanting to try roses for a while, so I gave it a shot:

The base here is taupe tulips which is an amazing neutral. The roses are done with  pink daisy, miss behave and pink chiffon and the white is done with White Lily. The roses were surprisingly easy. I don't have any dotting tools, but I used the end of a bobby-pin and again just some patience and a steady hand :) the lines are free handed as well. 

Now I think we're all caught up! If you'd like any tutorials of any of these looks, just comment below! Also, follow me on Instagram @gracieclancy :)

Until next time!


Thursday, January 30, 2014

Quick sponged ombré!

Hey all! 

I decided to do a quick sponged ombré to keep the length of my nails before valentines day for an exciting mani I have planned!

But until then, I took 3 of the more pinkish colors that I have and decided to do a sponged ombré. This was my first time, but I found it fairly easy.

I don't have step by step pictures, because this was a random, late-night idea that I really didn't like at first, but it's grown on me.

Here were my nails before I painted them. 


The lighting in my apartment sucks, but you get the idea. I was SUCH a biter before sensationail. I always wanted long nails, but could never keep them long. Well, that isn't a problem anymore! Now I have to worry about them being too long! Sensationail has really put a lot of effort and care into their product to give you what's best for your nail. Their acetone remover has vitamins A & E and eucalyptus oil to remove your polish but also condition your nails! LOVE IT! 

So here is the finished product of my sponged mani:


For the colors, I used Mi Amor (top), Pink Daisy (middle), and Pink Chiffon (bottom). Mi Amor looks more pink on the bottle, but dries more orange on your nail. That was what I didn't like at first. My nails looked more like candy corn to me than anything. But it really has grown on me and I love them now! 

Here are my nails with the sponge:


My process was:

-clean, buff, file and prime the nail.
- base coat and cure for 30
- paint a strip of each color on the sponge (I used a corner of an unused kitchen sponge because I don't have any makeup sponges) - yes, paint all the stripes on at once.
-sponge onto the nail lightly (this can be messy, so be prepared!)
- clean up excess around cuticles with cuticle stick or your own method of removal
- cure for 60 seconds and repeat the process.
- finally finish with a top coat and voila! Beautiful ombré nails! The heart is done in Little Gold Dress. 

I have noticed with the kitchen sponge that there are some bubbles in my nails. I personally don't mind it, but you might want to get makeup sponges if you don't want any bubbles :) 

Really make sure you clean your cuticles, because sensationail is not fun to get off of the skin and your mani could peel easier! 

I hope this method works for you! 

Thank you for reading :) 

Grace x


Wednesday, January 1, 2014

Pedi - Miss Behave review

Hey sensationail-ers!

HAPPY NEW YEAR! What better way to start off the new year than with a fresh pedi? Now, I will admit, I've been skeptical about putting gel polish on my feet. My toe nails have been very brittle lately (by lately I mean the last 4 years) but I think that was due to all of the stress I put them through playing collegiate field hockey. To test sensationail on my toes, I started by just applying the clear coat and letting that grow out. And just like with my own fingernails which were very brittle before sensationail, it helped my toe nails immensley! Now, I don't recommend slapping some sensationail polish on your toe nails if you have problems with them, see your podiatrist! Mine were just very dry and apt to breaking. 

For Christmas, I got FIVE new Sensationail colors. These are : Mi Amor, Little Gold Dress, Taupe Tulips, babydoll pink and miss behave. I used Mi Amor and Little gold dress in my last post and LOVE them! For my toes, I decided on Miss Behave because I generally like darker colors/red shades on my toes. You apply the sensationail just like your regular nails: buff, gel cleanser, primer, clear, cure 30, color, cure 60, repeat color, and top coat, cure 30. I also added a tiny babydoll pink/ pink daisy flowe just for fun :) 


Now, I hate my feet, so please don't judge me! 

Miss Behave is a deep, plumb-y, red. It's almost like a reddish-brown color. Very classy and sophisticated. Perfect for anytime or that party or wedding you have coming up that you need/want classy nails for. Another WIN for Sensationail! 

Hope you all have a great beginning to your year!

Happy 2014!!

Grace x


Sunday, December 29, 2013

Mi amor and Little Gold Dress review!

Hey Sensationailers!

Sorry for the haitus! I knew my mom was sending me some sensationail as a gift but it was lost in the mail for over a MONTH! But all is well now! And of course, like many of you, I couldn't wait to remove the old and put some new polish on! My old mani was disco fever tips with a Sugar Plum star/snowflake for Christmas 

I settled on this after many attempts with different nails stickers like this:

And this:


I LOVE the stickers, but I just couldn't get them to stay for the life of me. I think I'm going to stay away from any nail accessories bigger than a rhinestone because the always pop off for me. Some people have used nail glue to get them to stay on, but personally, I would rather try to work on my nail art technique. I've been looking into Winstonia nail brushes, if anyone has any input, please comment! :) 

My new mani is:

I tried to give a couple variations of lighting so you could see the difference. I love both of these colors. Mi amor is the peachy-pink color. The box is a little deceiving, as the color looks a little more pink, but it is a delightful peach color! It's refreshing after all of the silver and red I've been using for the holidays. The accent nail is "Little Gold Dress" and I am equally in love with this color! It has a nice shimmer to it and is the perfect gold color for all of your New Years festivities, if you are looking for anything too flashy! I hope this review and pictures help! Any questions or comments, just comment below! :) 

P.s. The Henna is done by hennani.co.uk (Instagram - @hennanorthernireland, twitter - @hennanorniron) such an amazing artist and a nice relaxing experience! If you live in the Belfast area, look her up! 

Grace x 


Saturday, December 7, 2013

First Winter Mani!

Hello Sensationail-ers!

Sorry for the long absence! School and job hunting takes up a ton of my time, plus the 2 weeks I get out of wearing sensationail! 

     This week, I decided to try something new - a sponge-gradient look. I have never done anything like this, but I'm pretty sure it's my new favorite nail look! It is actually very simple and the results are stunning!

Okay, first as usual, you want to remove any polish! (I removed mine a few days ago to let my nails breath a bit before applying a new color!) 

Then buff the natural shine off of your nail with the pink side of your buffer 


I had also cut my nails down a bit and filed them to shape them. I can't stand them when they are too long, and I find that they break easier when they are longer. Before sensationail, I always had very brittle nails, and I am a biter! But now they are stronger than ever! 

After you buff, you want to push back your cuticles, then clean your nails with your lint free wipe and gel cleanser:


Once clean, then apply your primer if you want to:


(I'm so mad that I spilled almost the whole bottle after my last mani!) 

The colors I decided to use for this gradient were Pink Chiffon and Disco Fever:


I used Pink Chiffon as a base:


And then I applied a small amount of Disco Fever to the sponge and sponged that onto the tip of my nail:


I applied the Disco Fever with a sponge and then sponged off any extra with a different side of the sponge. I cured this for a full minute, then applied another layer of disco fever, staying more towards the edge of my nail:


Wipe off the excess around your nail with an edge of the lint free wipe and cure for another 60 seconds. Then apply your top coat and voila:


I got the snowflake nail gem from Pound Land. I don't reccomend them. This one stayed on through washing the dishes, but popped right off while I was making the bed... Maybe with nail glue it might stay longer, but it is also bulky. I liked it at first but then became annoyed with it. You might have better luck than I did! I'm just happy I didn't spend a fortune on them!   

I was inspired to do this look after a chilly walk home at sunset. I will definitely be doing more sponge gradients! 

If you have any questions, don't hesitate to ask in the comments section!

Thank you!! 

Grace x 

PS:  www.sensationail.co.uk 4 FOR 3 FLASH SALE!  CLICK ON THE BANNER ON THE SENSATIONAIL HOMEPAGE AND GET 4 POLISHES FOR THE PRICE OF 3!!  INSTEAD OF £50, YOU ONLY PAY £37.50!! GET TWO FOR YOU AND TWO AS A CHRISTMAS GIFT... OR JUST TREAT YOURSELF TO 4 NEW POLISHES!


Monday, November 18, 2013

Christmas Nail-Art ideas!

Hey all! I just wanted to post some cute Christmas nail art ideas! I can't wait to get more colors to try these out! I found them all on Pinterest and I take no credit for them! I hope you enjoy! 


I saved my favorite for last! I really hope that I can do some of these this winter! Winter is one of my favorite seasons!

Enjoy!